home aircraft books history links old news quotes soft sounds weather
early electric power gliders helicopter indoor technology future
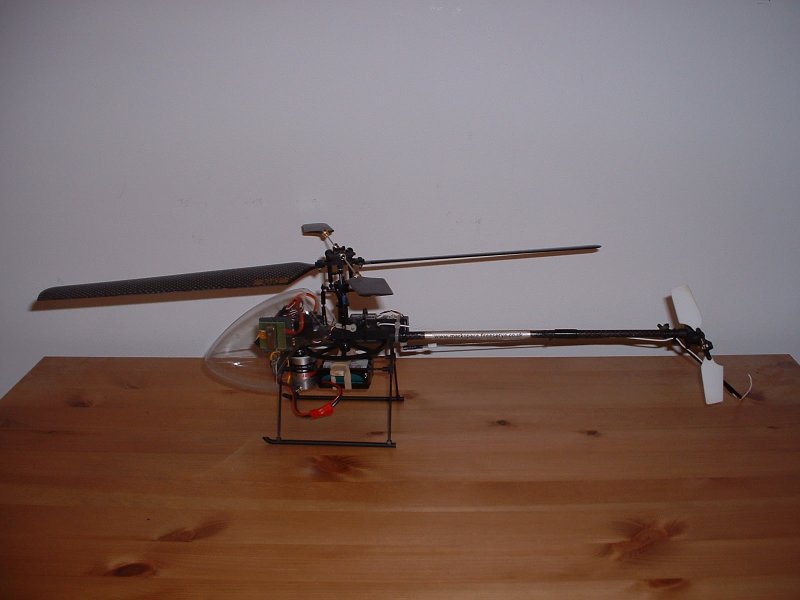
eco8 hornet
![]()
My 2nd heli.
Even before going for eco8 I had
considered an indoor mini heli like the ikarus
piccolo.
I had rejected the idea because of the extra difficulty involved in handling
something that small and fast.
The piccolo always looked a bit vague anyway.
Feb 2001 I saw some hornets flying.
They were a lot more positive, and looked better engineered all round,
including a shaft driven tail rotor and 9 ball races.
I wanted 1.
It also gave me something to fly indoor - the eco8 being really too big.
I bought the full package (excluding standard Tx) for just less than £300.
This thing is mostly carbon fibre and super glue with a bit of plastic
thrown in.
Even the main shaft was originally 3mm carbon.
A relatively straightforward build - mostly assembling the various bits onto
the chassis with super glue (sparingly) and double sided tape.
It is essential to make sure that all of the moving parts move freely,
requiring repeated dismantle/assembly of some parts e.g. the fully
teetering rotor head.
The ball links need freeing off, but not by sanding - the instrutions recommend
just nipping them up with pliers, which seems to work OK.
The main rotor shaft should be retained with a bit of silicone tubing slid
up it, rather than the glued collet supplied in the kit.
This allows the gears to disengage when they really need to.
I relocated the tail servo mounting plate from the tail boom itself, to as
much on the chassis as I could, making the tail boom more independent for
maintenance.
The tail rotor bevel gear drive is a little miracle in itself, with very few
parts - it just works.
I discarded the transparent plastic tail skid as a bit too bendy, and
initially did without, but you really do need to protect that tail rotor.
Later I fitted a bit of red control snake outer, and finally a 3mm carbon tail
skid.
I shortened the front legs by about 2mm to make it stand with its tail a little high, reasoning that it would help to take off, pointing forward a little.
7 cell 8.4V 700mAh nimh power pack driving a 300 motor through a 5A speed
controller.
4 channel Rx with a piezo rate gyro in the tail control.
I couldn't be bothered to paint the canopy.

Left to right - tail rotor pitch servo, aileron cyclic pitch servo, 7x celll 8.4V 700mAh nimh power pack with balsa retainer, elevator cyclic pitch servo, 300 motor, ms 4 channel Rx, 5A speed ontroller (under Rx).

...and on the other side. Left to right - ms 4 channel Rx, piezo rate gyro, 5A speed controller (under gyro), 300 motor, elevator cylic pitch servo, main power connector to 7x cell 8.4V 700mAh nimh power pack, aileron cyclic pitch servo, tail pitch servo.
I fitted the piccolo training undercarriage of carbon rods and ping pong
balls, and extra weights just inside the paddles which is supposed to add a bit
more gyroscopic stability and slow the control response a bit.
This of course made it heavier, meaning there was only just enough power to
lift off at the start of a charge.
I tried it in the garden, having several crashes, but it is a remarkably
rugged little beast.
These tend to displace the paddles, which should be straightened before having
another go.
Also the anti rotation bar that keeps the swash plate push rod in position
tends to break away, requiring regluing.
The other thing that tends to happen is the carbon main shaft splits.
Unfortunately, this is not immediately obvious, as everything remains attached,
but there is now a highly bendy/twisty thing between the motor and the main
rotor.
1 of the main effects of this is to cause a tail oscillation.
I initially thought it was due to a cheap gyro, but eventually learned to
recognise the symptoms and replace the shaft.
Finally, I found some 3mm silver steel and made a replacement metal shaft - not
easy, drilling 1mm pin holes through a 3mm steel shaft.
This added yet more weight, but the control was much more positive.
The modern kit now has a metal shaft.
February 2002.
Started using the FMS flight sim, which is great for getting practice time
in.
Eventually the main blades started to look a bit bashed, and I replaced
them.
I have broken the tail boom in the middle.
I've bought another, but it is currently flying OK with it taped up - the
internal tail drive shaft must have survived.
At some point I realised that the ping pong balls were unnecessary, and
removed them, saving a bit of weight and adding duration.
The remaining sticks tended to stick in the grass a little, so I would usually
take off from a folded newspaper.
I learned that the only thing to do with any heli is to leap into the clean air
- as trying to lift off gradually leads to disaster in the ground effect.
I have probably learnt most of my heli flying from this little thing.
Certainly going back to the eco8
seemed really easy.
I have now removed the training sticks and can reliably fly it tail in and nose
in, although I'm only just starting to join the 2 together.
| span | area | mass | loading |


hornet flying in the garden 2001.
Still has the training undercarriage.
Taking off from a sheet of paper to prevent snagging in the grass.
This was before I added a fin surface to help with the tail wagging.


hornet flying in the garden 2001.
Picture by carol with her camera.
Still has the training undercarriage.
Now has a fin surface to help with the tail wagging.
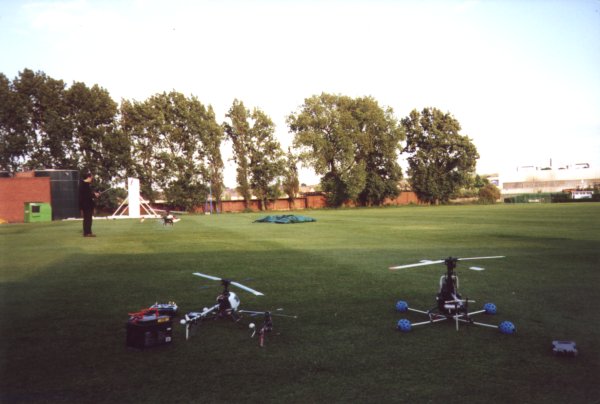
Mark's Ikarus eco8 and mscomposit hornet helis with others at heli themed evening club meeting September 2001.

Ikarus Eco8 and MS Composit Hornet electric helicopters. Indoor flying session at Coventry sports centre 2001.


MS Composit Hornet electric helicopter. Indoor flying session at Coventry
sports centre October 2001.
1st or 2nd flight without training undercarriage.
Metal main shaft, balsa bar power pack fixing, new Rx antenna.
New GWS yellow biplane in the background.
Photo taken by Lee/Jo with their digital camera.
Graham with the yellow biplane.
Dad, adrian and Jes in the background.

MS Composit Hornet electric helicopter. Indoor flying session at a Coventry
school November 10 2001.
Photo taken by Lee/Jo with their digital camera.